The npm blog has been discontinued.
Updates from the npm team are now published on the GitHub Blog and the GitHub Changelog.
How to email daily GIFs + use nodemailer w/ Gmail
Mornings can be rough. So, I thought, what’s better than the likes of this lil’ guy bringing some cheer to our bloated inboxes? And along the way we’ll make use of Giphy, nodemailer, cron, Google’s Developer Console, and Heroku.
Let’s go:

Setup
First, let’s make sure we have npm and node installed. You’ll also need to download the Heroku toolbelt (find more on installing Heroku here or feel free to use another application deployment tool).
Use the following command and walk through the prompts to get started with a new package.json file:
npm initNext, there are a few handy modules we’re gonna need. Use the following command to install these modules and save the dependencies to your package.json file:
npm install giphy nodemailer@0.7.1 dotenv express cron --save
Next, create a file called “app.js”. Let’s go ahead and instantiate some modules in this file.
require('dotenv').load();
var express = require('express'),
app = express(),
giphy = require( 'giphy' )( 'dc6zaTOxFJmzC' ),
nodemailer = require("nodemailer"),
CronJob = require('cron').CronJob;
Fetching random wombats from Giphy
Giphy is a wonderful resource for pulling GIFs for any occasion. Giphy’s API is open to the public — meaning, as a developer, you don’t need a unique secret key to use Giphy’s API. We’re going to set up a cron job that executes every day at 8:30 am EST (UTC–5) to call Giphy and request new wombats.
Giphy’s search call allows you to specify a number of things in your query, including the keyword you’re searching for, the number of GIFs you want the call to return, and the rating of the GIFs (e.g., Y, G, PG, PG-13 or R). Let’s use some incantations to take all the GIFs we receive and only assign one, at random, to the variable gif, using the public beta key dc6zaTOxFJmzC:
new CronJob('30 8 * * *', function() {
    giphy.search({
        q: 'wombats',
        limit:100,
        rating: 'g'
    }, function (err, res) {
        var gifs = res.data;
        var gif = gifs[Math.floor(Math.random()*gifs.length)];}
Emailing the wombats
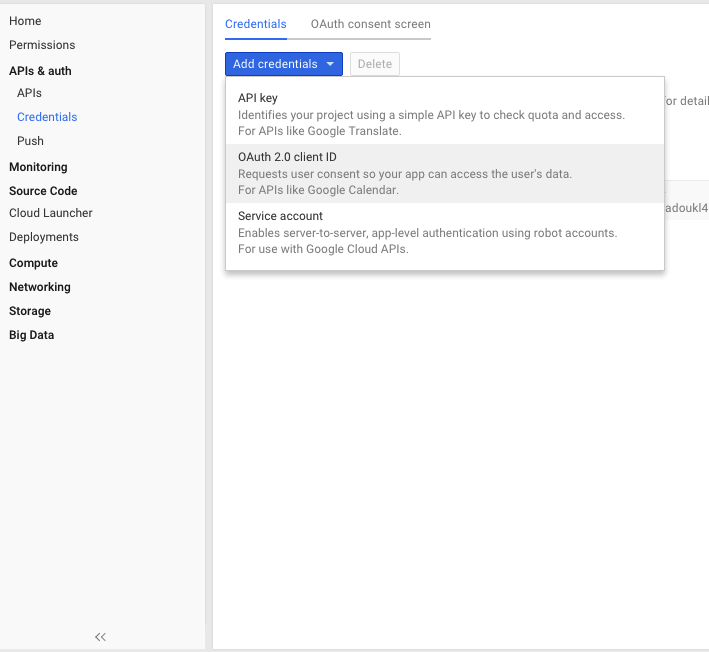
We’ll use GMail to deliver the wombats to our inbox, but before we can start emailing anything, we need to register our app on console.developers.google.com so that Google doesn’t block our emails.
First, click Create a project… and name it anything we like. Next navigate to Creditials under API & Auth. Under Add Credentials, click on OAuth 2.0 Client ID.
Make sure to include https://developers.google.com/oauthplayground under Authorized Redirect URLs. We’ll get to why this is necessary in just a minute.
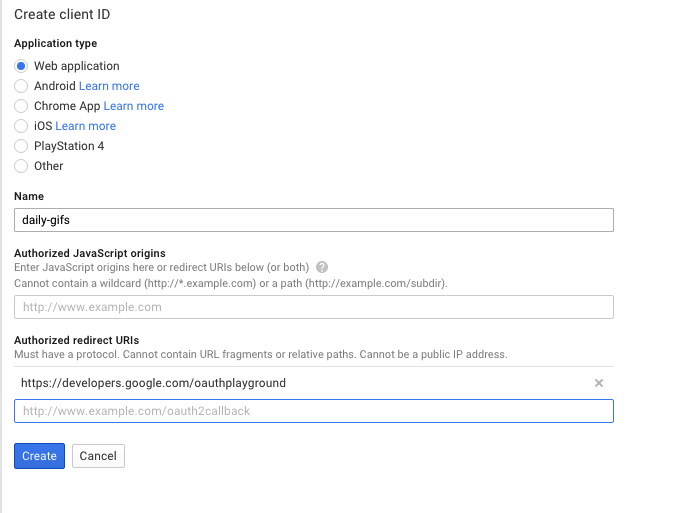
When you press Create, a window will greet you with your new Client ID and Client Secret.
Next go to https://developers.google.com/oauthplayground and click on the gear button in the upper right-hand corner. Check Use your own OAuth Credentials and enter the Client ID and Client Secret keys you just created into respective boxes.
Under the Step 1 dropdown, set https://mail.google.com as your scope like the following:

This step will redirect us to a window asking for permission to authorize use of the Gmail API. We’ll then be redirected back to https://developers.google.com/oauthplayground. If we hadn’t included this URL under Authorized Redirect URLs back in the developers console, we’d receive an error.
Under the Step 2 dropdown, click Exchange Authorization Code for Tokens. The resulting Refresh Token is important to us. Lastly, make sure to click Auto-refresh the token before it expires.
Whew! Now, on to the code.
First, we’re going to store all our new keys in a .env file to keep them private (If you add/commit any files to GitHub, make sure to include .env in a .gitignore file). Your .env file should look something like the following:
MY_EMAIL=example@gmail.com
MY_PASSWORD=some_numbers
MY_CLIENT_ID=lots_of_numbers.apps.googleusercontent.com
MY_CLIENT_SECRET=some_more_numbers
MY_REFRESH_TOKEN=_more numbers_
Next, use nodemailer to authenticate our Gmail login.
var smtpTransport = nodemailer.createTransport("SMTP",{
   service: "Gmail",
   auth: {
    XOAuth2: {
      user: process.env.MY_EMAIL, // Your gmail address.
                                            // Not @developer.gserviceaccount.com
      clientId: process.env.MY_CLIENT_ID,
      clientSecret: process.env.MY_CLIENT_SECRET,
      refreshToken: process.env.MY_REFRESH_TOKEN
    }
  }
});
Having done this, now it’s time to add more to our cron job code — so that it doesn’t just retrieve a wombat from Giphy, but emails it too. Here’s what to add:
new CronJob('30 8 * * *', function() {
    giphy.search({
        q: 'giraffes',
        limit:100,
        rating: 'g'
    }, function (err, res) {
        var gifs = res.data;
        var gif = gifs[Math.floor(Math.random()*gifs.length)];
        smtpTransport.sendMail({
        from: process.env.MY_EMAIL, // sender address
        to: "negishivs@gmail.com", // receiver address
        subject: "DAILY GIF ✔", // subject
        text: gif.images.downsized_large.url // body
       }, function(error, response){
           if(error){
               console.log(error);
           }else{
               console.log("Message sent: " + response.message);
           }
          });
      });
}, null, true, 'America/New_York');
Deploying to Heroku
Almost there!, but we need to do a few more things. Heroku requires your app to bind to port 5000. So using express, we’ll tell our app to point to port 5000:
app.set('port', (process.env.PORT || 5000));app.get('/', function(request, response) {
    var result = 'App is running'
    response.send(result);
}).listen(function() {
    console.log('App is running');
    //the rest of our app lives here, wrapped inside this function});
Create a file titled ‘Procfile’ without a file extension. This will tell Heroku the specific command it’ll need to use to run our app.
For web applications, we’d specify a “web” process which is responsible for responding to HTTP requests from users. All other processes are “workers.” These run continuously in the background. The contents of the Procfile should look like the following:
worker:node app.js
Now, use the following commands to launch your app
git add .
git commit -m “commit message”
git push heroku master
There you have it! You should be all set to receive a cute wombat in your inbox every morning.
If you receive a cute one (this is a trick question: they’re all cute), send it our way: tweet it with #wombatlove and bask in the glory and possible npm swag. And if you run into any trouble, just reach out.
Happy wombatting!